BillPay
BillPay and Paymetric Gateway (XiPay) work together to securely facilitate and perform hosted online payments for Merchants and their Customers (a.k.a. Buyers). The BillPay interface and functionality are customizable to meet the Merchant's functional needs.
BillPay key terms
Review the following key terms to help with your understanding of the setup, configuration and administration of the solution.
-
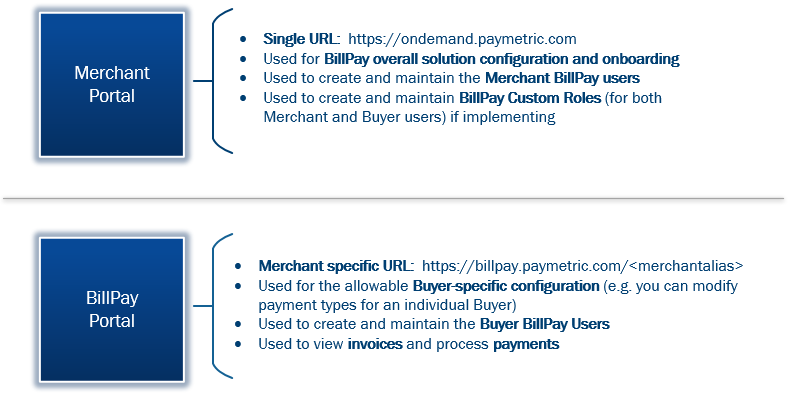
Merchant Portal – The interface used to setup and configure the BillPay solution.
-
BillPay Portal – The interface used to administer and use the BillPay solution. See the BillPay Portal online help for more information.
-
Merchant – Entity setup to process electronic payments and invoices. The Merchant exists in both Merchant Portal and BillPay. The same Merchant name is used in both interfaces. A Merchant User will access both Merchant Portal and BillPay with the same login credentials. Permissions for both interfaces are managed in Merchant Portal.
-
Buyer – Optional entity in the BillPay system to which Invoices are associated. Buyers are created in BillPay via Batch or RESTful API processing from the ERP system. A Merchant can choose to NOT implement Buyers in BillPay and use a custom field to associate invoices to Customers. A Merchant can choose to implement Buyers, but ONLY allow their CSRs/accounting personnel (i.e. the Merchant users) to use the BillPay interface. A Merchant can choose to implement Buyer users as well. Buyer users are created and maintained in BillPay; however, any custom roles for Buyers are maintained in Merchant Portal.
-
Merchant division – The Merchant Division represents the ERP business unit (e.g. company code) and is used in determining the appropriate Paymetric Gateway (XiPay) Payment Configuration (a.k.a. XIID) to which the invoice payment transaction should be routed. You must have at least one Merchant Division. When processing payments in BillPay, the XIID is determined by a unique combination of Merchant Division + Currency + Payment Type.
-
BillPay roles – If custom roles are enabled for the Merchant, a page is available in Merchant Portal to create these roles. You can create custom roles for both Merchant and Buyer users. For Merchant users, the roles will display when adding/editing a Merchant Portal user. For Buyer users, custom roles will display in the BillPay interface which is where these user types are created and maintained. See the BillPay online help for more information.
-
Invoices – An object in BillPay tied to a billing document in the ERP system. Can have multiple payments against it in the form of transactions.
-
Transactions – An object in BillPay that represents a payment. A transaction can be a Paymetric Gateway (XiPay) Transaction or some other form of payment. Paymetric Gateway (XiPay) Transactions are created when a payment is made via BillPay. The transaction source can be viewed in BillPay reports. Most transactions are tied to an invoice unless it is a Prepayment.
BillPay solution interfaces at-a-glance
There are certain tasks that are performed in Merchant Portal and some that are performed in BillPay. A Merchant's Buyer (i.e. Customer) Users would only access the BillPay Portal; he/she would never have access to the Merchant Portal. The following provides an at-a-glance view of which tasks are performed in which Portal site:
End-to-end BillPay configuration and onboarding process
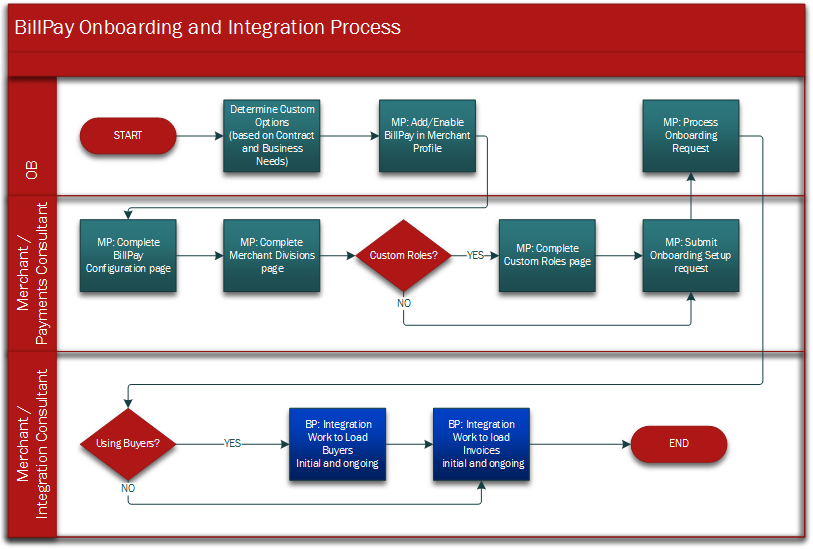
BillPay onboarding consists of the following high-level process steps:
-
-
Determine the features and functionality being implemented including any enhanced features.
-
Complete the settings on the BillPay Configuration page.
-
Complete the settings on the Merchant Division page.
-
If using Custom Roles, complete the Roles pages. NOTE: Custom Roles are required if you are implementing the BillPay Activity Report. You setup BillPay Teams after you create Merchant Users.
-
Submit the Onboarding Request via the Onboarding page.
-
Receive notification once the request is processed and continue with ERP integration.
-
End Merchant Portal configuration process. Continue with ERP integration activities and setup within the BillPay Portal (see BillPay Portal online help for information on that interface).
BillPay configuration prerequisites
BillPay must be enabled in the Merchant's Profile before any configuration can be performed. The selections made in the profile will affect what pages and configuration settings display.
Determine the features and functionality being implemented including any enhanced options.
Enter the appropriate IP Address, Range or Network for incoming BillPay traffic for both QA and Production environments on the Origination IPs page.