Confirmation Details
A Confirmation # is generated in BillPay in the following scenarios:
-
An invoice payment is made.
-
A credit is issued by the Merchant.
-
A one-time scheduled payment or installment payments are made.
-
A prepayment is made.
The Confirmation Details page provides information related to the Confirmation #.
Summary section
Contains
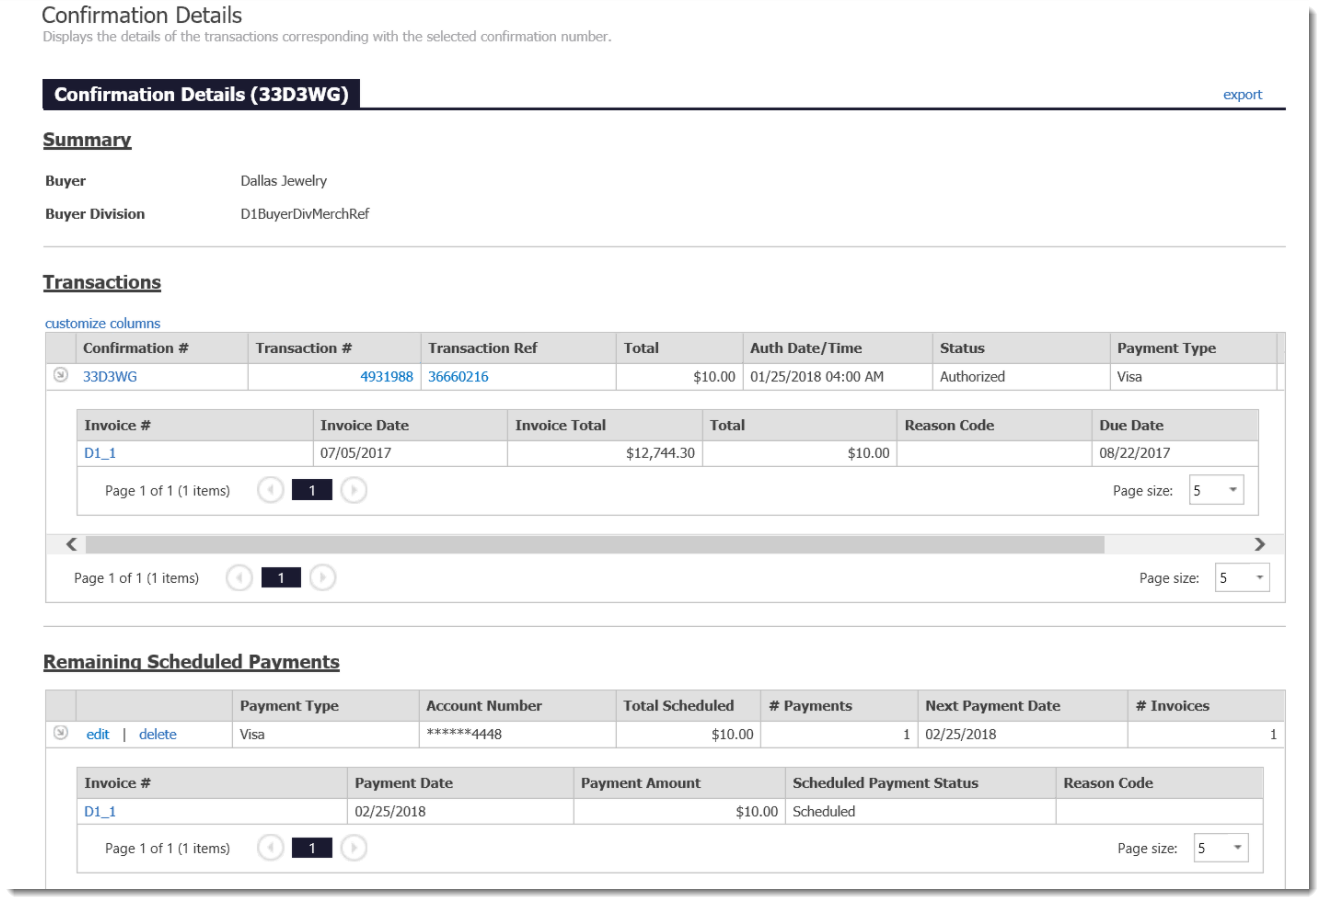
Transactions section
Lists all transactions associated with the Confirmation # with links to the transaction details. There may be multiple transactions for a single Confirmation # based the Merchant's configuration settings as well as the types of invoices that were paid and/or whether it was a scheduled payment.
You can click the expand arrow on a given transaction row to view invoice information.
![]()
Click customize columns as with any report or details page grid to include additional columns of information.
Field descriptions
The fields available are identified in the following table.
|
Field name |
Description |
|---|---|
|
Account Holder |
Name on the card or account. |
|
Account Number |
Displays the masked account number (credit card or echeck) used for the transaction. |
|
Auth Code |
The authorization code received from the payment processor. |
|
Auth Date/Time |
The date and time of the authorization. |
|
Confirmation # |
The confirmation number for the transaction. |
|
Convenience Fee |
The convenience fee amount for the transaction. This column only displays if the Merchant supports convenience fees, or if a fee exists for any transaction in the results list. |
|
Currency |
The currency of the transaction. |
|
Error Message |
The processor-specific message if a transaction (i.e., payment) was declined. |
|
Payment Type |
Displays the payment method used for the transaction. |
|
Source System |
The Source System indicates where the transaction/payment originating. This could be a system other than BillPay if the Merchant accepted a payment outside of BillPay and then uploaded it. |
|
Status |
The state of the transaction in Paymetric Gateway (XiPay). |
|
Status Code |
The Paymetric Gateway (XiPay) Transaction status. |
|
Subtotal |
The amount of the transaction total minus any fees (surcharge or convenience fee). |
|
Surcharge |
Surcharges display if the Merchant supports payment card Surcharges. Surcharges apply to credit card transactions only. Surcharges do not apply to echecks or debit cards. |
|
Transaction #/Ref |
The Paymetric Gateway (XiPay) Transaction ID or unique BillPay generated identifier for the transaction. |
|
Total |
The sum of the Surcharge or Convenience Fee and the Subtotal. |
|
XIID |
The Paymetric Gateway (XiPay) Server ID when in the XiPay WebGUI. |
Remaining scheduled payments
This section only displays if there are future scheduled payments associated with the given Confirmation #. This means, that when making the payment, you either entered it as a one-time payment scheduled in the future (Pay later option) or as an installment payment (Pay with installments option).
-
You can edit or delete scheduled payments from this page.
-
Once a transaction is generated for a scheduled payment, it will no longer be listed in this section and will instead be listed under Transactions with the same Confirmation #.
-
On the Transactions report, you will also see multiple transactions with the same Confirmation # if they are part of the same payment schedule.
-
Scheduled payment options are configurable by the Merchant and may not be available.
Confirmation Details page
You can access the Confirmation Details page, by clicking the Confirmation # link from any of the following pages or using the quick search:
-
On the Invoice Details page, the Confirmation # is a column available under the Transactions section.
-
On the Invoice Report page, click the expand arrow for a given invoice, the Confirmation # is on the Transactions tab.
-
On the Scheduled Payments Report, it is available as a filter option as well as a column in the results grid once the filter is applied.
-
You can use the Quick Search option at the very top of the page near the gear icon to access the Confirmation Details. Select Confirmation from the dropdown then enter the number.