TreviPay Notifications (Notification Relay)
You can enable TreviPay notifications from the Notification Relay. This allows merchants to enable the boarding of new Buyers using the Worldpay integration to TreviPay. The Notification Relay uses the Worldpay Token Vault to store the tokenized version of the Buyer_ID for security and to streamline ERP integrations. TreviPay refers to these notifications as webhooks. Merchant Portal uses the TreviPay buyer.updated webhook.
IMPORTANT: Only XiSecure token formats are supported for the TreviPay solution.
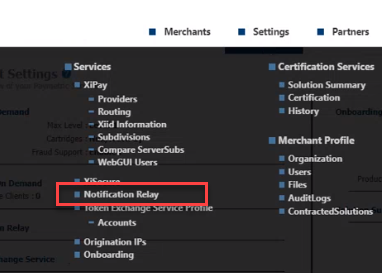
There are settings in Merchant Portal called "Notification Relay" that are required to configure TreviPay notifications. After the Onboarding team enables the Service and Providers in the merchant's profile, menu options display under the Settings menu.
Configure TreviPay notifications
-
After it is enabled in the Merchant Profile wizard, the Notification Relay section will appear under the Settings menu for the merchant.
-
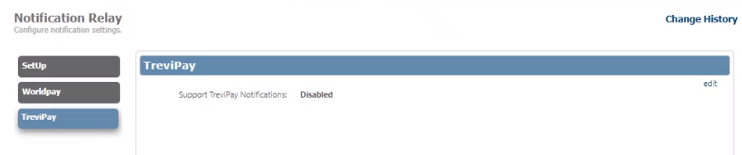
Select TreviPay, and then click edit.
-
Configure Notification Relay to determine how merchants will receive TreviPay notifications:
-
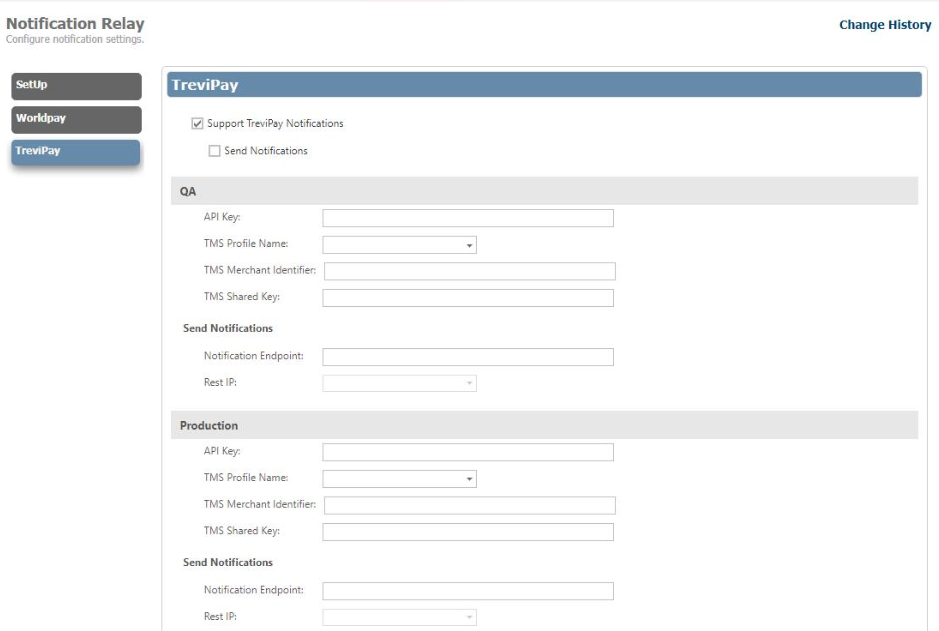
Select Support TreviPay Notifications to enable notifications and activate configuration fields.
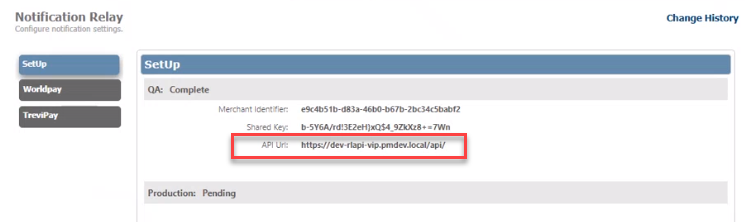
The merchant can retrieve TreviPay notifications using the API url, which can be found at Notification Relay > Setup > API url.
-
Select Send Notifications to automatically send the notifications to the merchant's configured Notification Endpoint.
-
-
For each configuration, enter the following QA value and Production values:
-
API Key – TreviPay API key.
-
TMS Profile Name – Name of the "complete" Token Exchange Service profile. This must be enabled in the Token Exchange Service Profile. If you edit the profile and its status is not "complete," the following message will display: TMS Profile Name has been changed. Please choose a TMS Profile again and save.
-
TMS Merchant Identifier – Enter (or copy/paste) the Merchant Identifier from the Token Exchange Service Account.
-
TMS Shared Key – Enter (or copy/paste) the Shared Key from the Token Exchange Service Account.
-
Send Notifications: Notification Endpoint – IP address to receive TreviPay notifications at.
-
Send Notifications: Rest IP – IP address of the notification endpoint. If your development environment has an IP whitelist, ensure that TreviPay notifications can be delivered. These IPs can be found on the Origination IP page.
-
-
Click save. Continue to submit the onboarding request.