BillPay Configuration
Review the top-level BillPay topic if you are new to BillPay configuration. It provides key terms and an understanding of the overall configuration process for the solution as well as what tasks are performed in Merchant Portal vs. BillPay Portal.
Prerequisites and considerations
There are various settings that only display if they are enabled.
-
You will not see the BillPay section under the Settings > Services menu if it is not added to your Merchant Profile.
-
The Custom Data, Payments (enhanced), Receipt and Single Sign-On tabs will only display based on the features that have been enabled by Paymetric.
-
You should review the BillPay Basic and Enhanced Features topic to determine your enhanced feature needs and assist in your understanding of the configuration settings.
-
For Merchants implementing Buyers, settings in Merchant Portal are global settings across all Buyers. Some of these settings can be overridden for a given Buyer via the BillPay Portal Buyer Configuration page.
Complete BillPay configuration
Validations on the configuration settings are not performed until you submit the Onboarding setup request. (I.e., You are allowed to save the BillPay settings even if required fields are left blank so you do not have to complete everything at once.) You will receive an error message if there are blank required fields when you attempt to submit the Onboarding setup request. See BillPay Minimum Required Fields to Onboard for more details.
-
Go to the Settings > BillPay menu.
-
Complete the appropriate fields on each tab that is displayed. The blue info icon indicates the tab only displays if additional enhanced functionality is enabled. See the sections below for detailed field descriptions and/or instructions per tab.
-
For new onboarding, perform the following next steps; otherwise, continue to onboarding request to submit configuration changes.
-
Complete the Merchant Division configuration if you have not done so already.
-
If you are implementing Custom Roles, complete that page as well.
-
-
To complete the environment setup, you must submit the Onboarding Request via the Onboarding page once all BillPay setup and configuration tasks have been performed.
NOTE: You cannot implement both subsidiaries and single sign-on functionality.
Setup tab
Once your BillPay onboarding requests are processed and your environment has been created, the following values are displayed on the Setup tab.
| Field | Description |
|---|---|
|
Merchant Identifier |
A unique value assigned by Paymetric that is included in the request message header as the 'merchant-ref' value. |
|
Shared Key |
Shared key generated by the Merchant Portal that the merchant uses to sign the request messages. The value is used to generate the 'authorization' header value. The value is not included in the request message body. |
|
API Url |
The root endpoint for the BillPay REST API. |
General tab
Complete the appropriate fields, and then click save.
| Field | Description |
|---|---|
|
XiTransfer Shortname |
Auto-populated. Defines the folder name from which the batch files will be retrieved. Recommend leaving default value. |
|
URL Alias |
Defines the Merchant's BillPay URL alias. Do not include https, www, etc.; only enter the alias value as a single-word.
|
|
Reply-to Address |
The address used if a Buyer user clicks reply in the receipt emails. This address will also be used for Buyer Email Notifications. |
|
Support URL |
Enter the full Merchant URL that users should be taken to when they select the “Support” link from BillPay. Once a URL is entered, you will have the ability to select a ‘test’ link to ensure the URL is valid. |
|
Support Email |
Enter an email address that users will be able to contact support from BillPay. You can enter a maximum of 256 characters in this field. When configured, users will be able to email support by clicking "Contact Us" located under the gear icon in the BillPay Portal. |
|
Support Buyers |
Select if a merchant will have Buyers. This setting controls if the Buyer related settings and options display in the BillPay Portal. |
|
Allow Buyers Access to XiBillPay |
If a merchant supports buyers, select this option if you want to allow Buyers to access BillPay Portal. |
|
Allow Buyers to Manage Users |
If a merchant supports buyers, select this option if you want to allow buyers to manage their own users (add, edit, delete) if desired. |
|
Notification Endpoint |
This option only displays if Near Real-Time (RESTful API) is enabled by Paymetric for the Merchant. Enter the full URL for both QA and PROD at which BillPay JSON or XML notifications will be received. |
|
REST IP |
This option only displays if Near Real-Time (RESTful API) is enabled by Paymetric for the Merchant. The QA and PROD dropdowns are populated with all IP Addresses defined on the Origination IP page. Select the appropriate ones from the dropdown for both QA and Production. If you do not see the correct information in the dropdown, go to Settings > Origination IPs and add the appropriate detail. |
|
Batch IP |
The QA and PROD dropdowns are populated with all IP Addresses defined on the Origination IP page. Select the appropriate ones from the dropdown for both QA and Production. If you do not see the correct information in the dropdown, go to Settings > Origination IPs and add the appropriate detail. |
|
Use Paymetric Gateway (XiPay) Auto-Capture |
If you want to automatically capture the transactions for settlement when an invoice is paid, then SELECT this checkbox to enable auto-capture. When enabled, the Paymetric Gateway (XiPay) Sale Operation is used rather than an Authorization in BillPay. If you want to submit settlement from your ERP system, then leave this checkbox DE-SELECTED. NOTES:
|
|
Display Due Date |
You can change this setting to not display an invoice due date in BillPay Portal. The default is "Yes" to display it. |
|
Display Balance Totals on Pay Invoices |
Select to display the total unpaid and past due invoices at the top of the Pay Invoices page for the selected Buyer. It displays on the first step when selecting invoices. |
Custom Data tab
This tab displays when Paymetric has enabled Custom Invoice Fields, Subsidiaries, and/or Custom Message for the Merchant. Custom Data fields can consist of Invoice Data fields and Subsidiary fields. This example only has Invoice Data. You are limited to a total of five (5) Invoice Data fields. Invoice Custom Data field(s) will display on the Invoices Report and Invoice Details page in BillPay Portal.
To add a Custom Data field:
-
Click edit, click add, and then enter the field name to create a custom field.
-
Click save.
NOTE: You cannot implement both subsidiaries and single sign-on functionality.
To add a Custom Message:
-
Click edit.
-
Select Display Custom Message to enable the message. When enabled, the custom message will display every time a Merchant or Buyer user logs into BillPay.
-
Select whether to display the message Indefinitely or by a Date Range. If you select a date range, select start and end dates.
-
Enter your message.
-
Click save.
Payments tab (basic)
Complete the appropriate fields, and then click save.
| Field | Description |
|---|---|
|
Supported Currencies |
Select the currencies to support in BillPay. The dropdown allows multiple selections. BillPay supports the following currencies:
|
|
Supported Card Types |
Select the card types to support in BillPay. The dropdown allows multiple selections. Currently, BillPay only supports Visa, MasterCard, American Express, and Discover. |
|
Support eCheck |
Select if you want to support eCheck payments in BillPay. If enabled, the Terms & Conditions text box displays. If you choose to use the default text, be sure to modify the values in brackets [ ]. See Terms & Conditions for more details. |
|
Always Use Separate Authorizations |
Select if you want multiple invoices being paid at once, to process as separate authorizations. |
|
Prepopulate Payment Info |
Select if you want to prepopulate the Phone, Email, Name and/or Address form the invoice on the Pay Invoices page in BillPay Portal. The data is uploaded to BillPay with the invoice. If the data is present, but this setting is not enabled, the data will not prepopulate. |
|
Display Security Code Field |
Select if you want the CVV field to display in BillPay. You can also indicated if you want it to be required or not. |
Payments tab (enhanced)
This tab and what fields display on the tab are dependent upon what features Paymetric has enabled for the Merchant. Complete the appropriate fields, and then click save.
| Field | Description |
|---|---|
|
Allow Merchants to Accept Payments |
Select if you want to allow merchant users to submit payments on behalf of the buyer. |
|
Support Transaction Credits |
This option is not available if Surcharges are enabled by Paymetric in your profile. Select this option to provide the ability for a Merchant user to issue a credit against a settled transaction. The user would also need the appropriate permissions assigned to issue a credit. Note that a transaction credit is different than a credit invoice. There is no configuration in the BillPay Platform specific to credit invoices; this is handled on the client-side. |
|
Support Level 3 |
Select this option if you want to support Level 3. |
|
Support FSA |
Select this option if you want to support flexible spending account (FSA) payments. |
|
Support Voids |
Select this option to allow the option for a Merchant user to issue a credit against a settled transaction. The user would also need the appropriate permissions assigned to issue a credit. |
|
Support Surcharge |
This option is not available if Transaction Credits is enabled by Paymetric in your profile. Select if you want to enable Surcharges for all of your Buyers. It has an associated percentage and disclosure text box that must be configured. See Payment Card Surcharges for more information. If you select this option, you cannot support Convenience Fees. |
|
Support Convenience Fees |
This option is not available if Transaction Credits is enabled by Paymetric in your profile. Select if you want to enable Convenience Fees. This is a flat fee added to transactions regardless of the payment method. See Payment Card Convenience Fees for more information. If you select this option, you cannot support Surcharges. |
|
Residual/Partial Payment Settings |
Depending upon what is enabled in the Merchant's profile, this may have Residual Payment Settings, Partial Payment Settings or both.
NOTE: For SAP implementations, you should only have one option enabled, either Residual or Partial payments. Additional Notes: If you have both Partial and Residual payments enabled in Merchant Portal:
|
|
Support Scheduled Payments |
Select if you want to allow a single payment to be scheduled for a future date. If enabled, the additional configuration fields are available:
Support Scheduled Payments & Support Installments can be enabled/disabled per buyer within BillPay. |
|
Support Prepayments |
Select if you want to allow payments to be made that are not tied to an invoice. This setting can be configured per individual Buyer in the BillPay Portal. If enabled, Merchants must also select the applicable Merchant Division and Supported Prepayment Currencies on the Buyer configuration page within the BillPay portal for their buyers, in order for the Prepayment functionality to be utilized. |
|
Allow Merchants to Accept Payments |
Select if you want to allow merchant users to submit payments on behalf of the buyer. |
Receipts data tab
This tab only displays if Paymetric has enabled either Customize Receipts or Email Receipts for the Merchant.
The additional configuration checkboxes display depending upon what has been enabled related to Receipts. With the exception of the Logo, all other checkboxes that remain de-selected will result in a blank space on the receipt.
Complete the appropriate fields then click save.
| Field | Description |
|---|---|
|
Email Receipt on Payment |
Only displays if Email Receipts enabled by Paymetric. Select if you want a receipt sent to the buyer user’s email address when a payment is submitted. If the Merchant does not support Buyers or if a merchant user is making a payment on behalf of the buyer, the Merchant can enter an email address on the ‘Payment Confirmation’ page in BillPay Portal. |
|
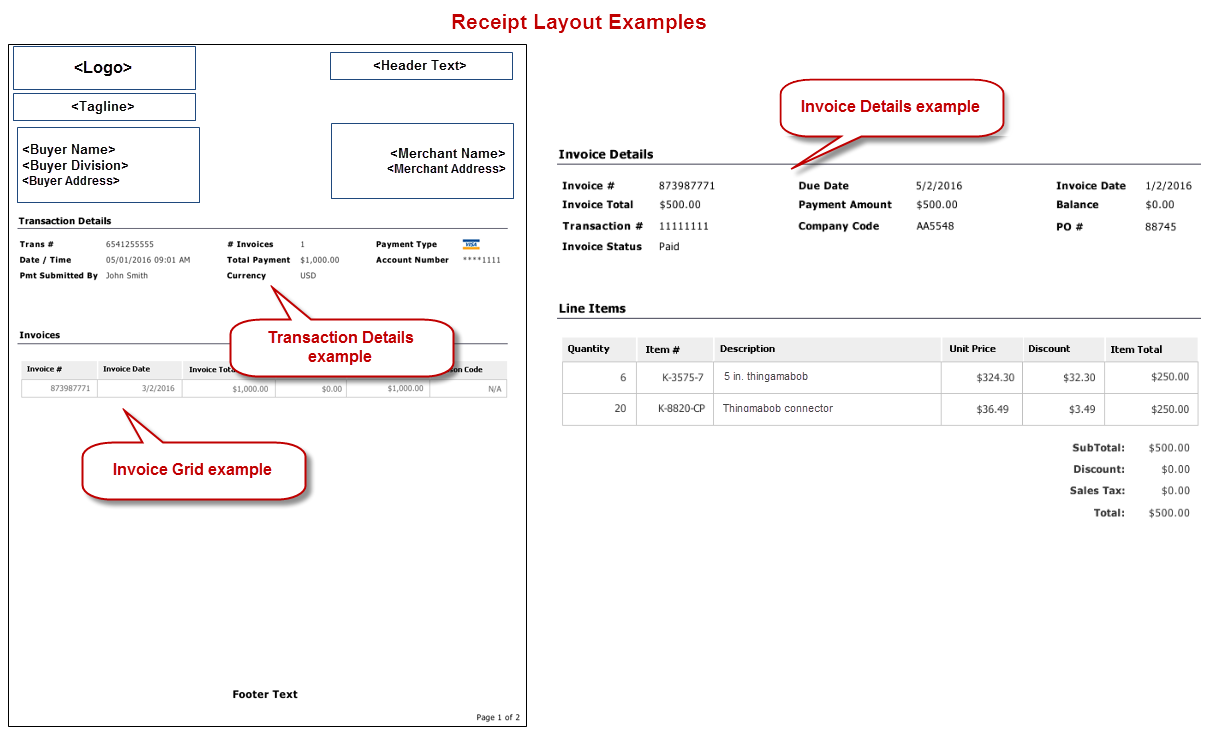
Logo |
The Merchant’s logo that displays on receipts. This is configured in BillPay. If no logo is uploaded, the Worldpay logo displays. Maximum image size is 600x140. |
|
Tagline |
The Merchant’s tagline that will display on receipts directly below the logo image. This is configured in BillPay. If no image is uploaded, nothing displays. Maximum image size is 600x80. |
|
Header Text |
Free-form text that a merchant may choose to display on the receipt. |
|
Buyer Name |
Name of the Buyer in BillPay. Blank if buyers are not supported. |
|
Buyer Division |
Name of the Buyer Division associated with the Invoice. Blank if buyers are not supported. |
|
Buyer Address |
The Buyer's address from the Profile. Blank if buyers are not supported. Cannot be edited via BillPay Portal. |
|
Merchant Name |
This is the Merchant Name that is established by Paymetric in Merchant Portal. You can view this name within the Merchant Profile in Merchant Portal and Merchant Settings in BillPay Portal. This cannot be edited by the Merchant. |
|
Merchant Address |
Displays the address entered in the Merchant Settings in BillPay Portal. |
|
Transaction Details |
The Transaction Details section as represented in the example below. |
|
Invoice Grid |
A high-level view of all invoices associated to the specific transactions. |
|
Invoice Details |
Displays additional information for the invoices. |
|
Line Items |
Displays line item details for the invoices. |
|
Footer Text |
Free-form text that a merchant may choose to display on the footer of the receipt. Note that the footer text only displays on the first page of the receipt. |
Single Sign-On tab
This tab only displays if the single sign-on feature is enabled by Paymetric for the merchant.
Complete the appropriate fields then click save. See the table for configurable field descriptions.
Note: See BillPay Single Sign-On Functionality topic for more details on how this feature works.
| Field | Description |
|---|---|
|
Support Single Sign-On |
Allows the merchant control whether single sign-on functionality is enabled. Select checkbox to enable it. When enabled, the additional configuration fields below display. |
|
Protocol |
The underlying communication method used by the merchant to communicate with the SSO provider. As the publish date of this help site, Paymetric supports the following Protocols: OpenID Connect, SAML 2.0, and WS-Federation. |
|
Support Mixed Mode |
Select this option to allow users to log in to BillPay Portal using either BillPay login credentials or the merchant's SSO credentials. If enabled, the BillPay Portal login page will have username / password field with sign-in button for BillPay login and also another button that reads "sign in with {Display Name}", where display name is defined by the merchant. See the next configuration setting in this table. |
|
Display Name |
The text that displays on the SSO button on the BillPay Portal login page. |
|
QA Single Sign-On Certificate |
The signed client certificate provided by the merchant used to authenticate to the QA environment. Paymetric uploads the certificate to a Ping-Federate SSO provider. You will see options to upload a new certificate, or to replace or delete an existing one. The associated UID is not needed by the merchant; it is for Paymetric use. The certificate field is optional as not all SSO protocols require it. Your consultant can help with this determination. |
|
PROD Single Sign-On Certificate |
The signed client certificate provided by the merchant used to authenticate to the PROD environment. Paymetric uploads the certificate to a Ping-Federate SSO provider. You will see options to upload a new certificate, or to replace or delete an existing one. The associated UID is not needed by the merchant; it is for Paymetric use. The certificate field is optional as not all SSO protocols require it. Your consultant can help with this determination. |
Buyer Notifications tab
Buyer Notifications are the configuration settings that allow Merchants to automatically send printed invoices to Buyers via mail.
This tab and the various settings only display based what Paymetric has enabled in the Merchant profile wizard.
Click edit, complete the appropriate fields, and then click save.
| Field | Description |
|---|---|
|
Support Buyer Notifications |
Select to enable the buyer notification features. This setting controls whether the Buyer Notification page displays in BillPay Portal. |
|
Support Email Notifications |
Select to enable the email notifications feature. If selected, the email used for the "From" / "Reply-to" is the email you configure in the General tab > Reply-to Address field. |
|
Support Print to Mail Notifications |
Select to enable print to mail feature. If selected the additional supporting fields are enabled for editing. Complete the Return Address fields for the printed and mailed invoices. |
|
Support New Invoice Notification |
Select to enable automatic notifications whenever a new invoices is uploaded. Given that Print to Mail (PTM) has additional costs associated with it, it is not enabled by default. It must be enabled per Buyer in BillPay Portal. NOTE EXCEPTION: If both email and PTM notifications are enabled AND there are no Buyer user/email accounts in BillPay, then PTM notifications are defaulted unless any edit is made to the Buyer Notifications settings in BillPay Portal. |